Categories
Blog

Remote Cybersecurity: Best Safety Practices for Working from Home

Amid all the upheaval of the past couple years of life and business in the age of COVID, certain business trends have risen to the surface as the most likely to create long-term change. These include a sharp rise in remote work and remote cybersecurity, which are changes that don’t look to be going away anytime soon— if ever.

COVID created an unprecedented migration to remote working on a scale that we’ve never seen before. While some of these at-home workers are returning to the office, others aren’t yet and may never come back in a full-time way.

Working from home is here, and it’s here to stay. This transition has created new cybersecurity concerns and required adjustments to cybersecurity strategy along the way. Moving forward, businesses need to adopt specific remote cybersecurity policies to keep their local resources safe while allowing employees the access they need to do their jobs.

These are just some of the ways that remote work affects a business’s cybersecurity strategy.

Access to On-Premises Server and Data

If your business uses an on-premises server, giving access to on-premises employees is straightforward enough. But access for off-site employees is more complex.

Many businesses rely on virtual private network, or VPN, technology to allow off-site employees to access the network, often from their home computers. But once they’ve made that connection into your network, it’s like they’re sitting in the office next to you — with access to everything digital you can access in the office.

Whatever’s going on in their house or off-site location is now exposed onto your network. An insecure device (or one that’s already compromised by malware) could now have access to your entire on-premises server and network.

Your employees do need access to your local network, but this access can create new threats.

Be sure to limit broad VPN-level access to employees and vendors who really need it. And if you do allow users to use their own computers, you need to require monitoring of those devices and ensure they’re protected with antivirus and antimalware solutions.

Best Practice: Company-Owned Hardware at Home

Companies looking to create a robust remote cybersecurity policy for the first time need to consider further adjustments beyond whatever stopgap measures went into place during COVID.

The best practice in this regard is to require at-home employees to use company hardware that’s managed with endpoint protection. This wasn’t always possible during the unexpected COVID shutdowns. Supply chain issues made new hardware hard to source, and this is still an ongoing concern.

But as you transition to a more long-term work-from-home policy, company hardware with endpoint protection should be a part of the picture.

Small Businesses Should Consider Implementing Access Control

Access control is another component of a strong cybersecurity strategy. VPN access becomes more dangerous when users have access to the entire network. Implementing an access control system limits users’ access to only those network areas that they have a business reason to access.

Without access control, any user (and any user’s device) can access anything that’s on your network — from critical, sensitive company data to customer data and more. But with access control, you limit risk by limiting that access.

Not Every VPN Is Created Equal in Remote Cybersecurity

VPN access is still going to be a significant component for remote work for many businesses. It’s important to understand that VPNs aren’t inherently bad or insecure. They just can’t themselves fix insecure or compromised devices that connect through them.

That said, not every VPN is equally powerful or secure. Some are better than others. Your IT partner can help you land on a best-in-class VPN. When coupled with better overall cybersecurity strategy, you’ll reduce your risk considerably.

Need help implementing a better VPN solution or creating a more robust remote cybersecurity strategy? Data Magic is ready to serve all your managed IT needs. Reach out below!

Categories
Blog

How Long Do Laptops Last? Keeping Your Company Up To Date

Despite how often you hear about how long a laptop lasts, the amount of time they actually last may surprise you. Read on to learn more.

Why is this important to you as a business owner? The average cost of a new business laptop can be up to $3,000, so replacing older models can eat into your equipment budget. However, the last thing you want is your employees using outdated laptops that could fail and compromise your company’s information

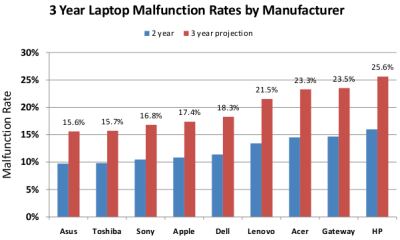
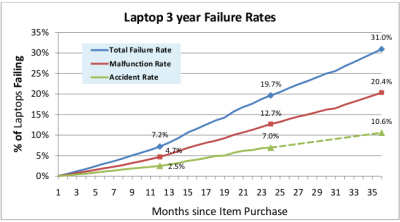
The Average Laptop Lasts ~3 Years

Most people have the mistaken belief that laptops should last for a minimum of three to five years before they need replacement because laptop manufacturers often suggest this time frame for their laptop warranty period.

However, the truth is that the average laptop only lasts for about three years at the maximum. Many products, including computers, are built with fixed obsolescence. They operate for a short while by design. So, if your employees are using a five-year-old laptop, they may be putting themselves and your company at a security risk.

Source

While the average laptop lasts about three years, most business-use laptops will only last two. Top brands may last for five years with regular use. Most mainstream manufacturers (like Dell, HP, and Toshiba) include a three-year limited warranty with their laptops. The warranty doesn’t predict how long your laptop will actually survive, though.

Manufacturers ask, “How long should a laptop last?” and keep their guarantees within that time frame. The warranty is there to protect your laptop if something unusual goes wrong during the first three years. After that, manufacturers know the risk increases that a computer will develop problems. 

Many factors can affect the answer to the laptop longevity question. A few reasons laptops don’t last as long as people think they should include the release of a new model, the number of laptops available, and user habits. 

New Laptop Models Make Old Ones Obsolete

Many businesses purchase laptops from companies that have already started manufacturing newer model, which means their older models will be phased out and won’t receive software updates anymore.

Variety Can Make it Harder to Get Laptop Repairs

So many different laptop brands are available today with varying quality levels. As such, it can be challenging to find one that lasts long-term or has good customer service when you need help fixing your broken machine.

User Habits Can Shorten Laptop Life

The third reason laptop lifespans tend to be shorter than most people think is how they’re used. To determine how long a laptop will last, you have to consider how well the user takes care of them. 

Source

For example, how much time does an employee spend on a laptop each day? Do they eat near it so crumbs can get beneath the keys? Do they handle it carefully? Are they able to download any software they want that can take up memory or pose security risks? Is there an antivirus program? 

Furthermore, if they use it most of each day without letting it cool down or rest and aren’t careful with it, it will obviously break down faster than if they only used it occasionally.

How Long Do Desktops Last?

So if laptops only last between two and three years, what about desktops? The good news is that desktops tend to last longer. Desktop computers are made of more robust materials, which means there’s less chance of them breaking down. For this reason, most desktop computers will probably still be working after five years – how many laptops can say the same?

Another reason that desktops usually last longer than laptops is because of how often employees are using them. Since desktops are generally stationary, you don’t use them as much, which gives them frequent breaks to help the hardware components last longer. This also means they don’t get roughed up and bumped around in travel.

In addition, if one of the components fails, such as the keyboard or mouse, you can easily replace it with a new one. However, this is much more complicated with a laptop, which is why desktop computers tend to last longer than laptops.

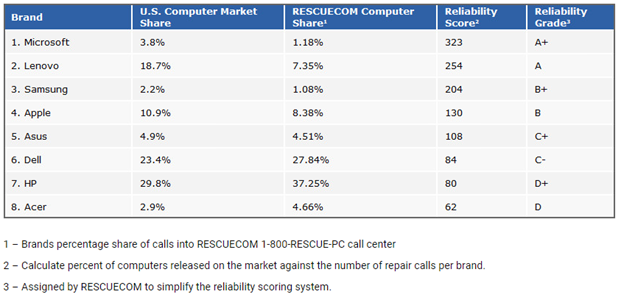
Source: RESCUECOM Holiday Computer Reliability Report

How Often Should You Replace Your Laptop?

How do you know how often you should replace the laptops in your company? Unfortunately, there’s no magic formula to answer this.

You could replace older computers on a schedule to prevent failures and data loss, or you can watch for signs that laptops are nearing the end of their useful lives. 

Some signs will usually emerge to warn you that it’s time to replace an employee’s laptop:

  • You can no longer update the software.
  • You are no longer able to connect to the internet or other devices on the network.
  • Your computer is running hot, and it slows down or freezes.
  • You have to bypass security software on your computer that keeps popping up when you try to use a specific program or connect to the internet.
  • The hard drive on your laptop is no longer working effectively, leaving less memory storage space for new files and applications.
  • Hardware components (keyboard, mouse, ports) on the laptop are failing.

To ensure that your employees’ laptops work well for as long as possible, here are some things you can do:

  1. Have your IT staff update any software on the laptop every time a new version becomes available. Don’t wait until the next major release comes out and let the current version sit there without updates when it needs them. You can also get additional help from a managed IT service.
  2. Consider investing in a laptop cooling pad to help regulate how hot it runs and how long it lasts before you need to have it serviced.
  3. If one component (such as the hard drive) fails, invest in a hardware component that has good customer support or a warranty so you can get assistance if it breaks down again in the future.

Conclusion

To sum up, the answer to the question of laptop longevity depends a great deal on how well you and your employees take care of them. If you maintain laptops properly, they may very well outlast their warranty period and give many years of service. 

However, if you or your employees end up misusing them or not maintaining them at all, then your laptops could last only a year or two, or even less.

If you’re looking for personalized help in managing your company’s laptop or desktop IT needs, we can help. A one-stop managed service like Data Magic is the perfect solution for your company, no matter how big or small. Get in touch today for a free consultation, and let us help you with all of your IT needs.

Categories
Blog

Email Regret? Quickly Learn How to Recall an Email in Outlook in 2021

Have you ever sent a work email that you instantly regretted or wondered how to recall an email that you sent? Sometimes it’s an embarrassing typo or an accidental early send, but often it’s worse than that. Maybe you realized — only after sending — that something came across negatively, not in the way you intended. Or, even worse, perhaps you sent a sensitive email to the wrong person entirely!

We’ve all experienced email regret. But if you’re working at a company that uses Microsoft Outlook as its email platform, you need to know about a feature that may save you from the embarrassment of email regret: how to recall an email with message recall and resend.

This week’s tech tip will teach you exactly how to recall an email in Outlook, plus the limitations you need to be aware of when you want to recall Outlook email.

What Is Message Recall in Outlook?

Message Recall is a feature built into Microsoft Outlook that does exactly what it sounds like: it allows you to retract or recall an email that you’ve sent on the platform. There’s another feature, called Message Resend, which enables you to rework the message and send it again, replacing it in the recipients’ inboxes (at least some of the time — see the limitations below).

Limitations of Message Recall

Message Recall is a powerful feature that can save you embarrassment, awkward apologies and more. That said, there are some limitations you need to know about. First, the feature only works if recipients have not yet opened your email.

This is a frustrating limitation, but it makes sense. No one wants to end up in a situation where they know they read an email, but the other person insists it said something different. Unfortunately, that’s what could happen if message recall worked even after the message had been opened.

Also, if you’re emailing somebody else outside your organization or someone who does not use the Outlook desktop client, Message Recall won’t work. You also can’t do this feature from the Outlook mobile app at this time.

Last, if your email gets automatically moved to a subfolder on the recipient’s end, Message Recall will not be successful.

How to Recall an Email in Outlook

So, now that you know the limitations and the risks, here’s how to recall an email in Outlook.

Find the message in your “Sent” folder.

Double-click the email to open it in a separate window.

Click “More Actions” in the top right-hand corner.

Select “Recall the message.”

Choose whether to recall (retract entirely) the message or resend it (replace it with a corrected/amended version).

Once you click the final button to recall or resend the message, the dialog box will go away, and the process is done. At this point, many users wonder whether the function worked or not. And it’s a good question: unfortunately, you won’t know immediately whether your message was recalled successfully.

When you use the feature and it works successfully, there’s a successful recall message Outlook will display for you. Similarly, when the feature doesn’t succeed, you’ll get a recall message failure notification. Both of these message types come through like an email, so you’ll see them in your inbox like any other message.

That’s it for this week’s tech tip. Be sure to follow Data Magic for more tips like these, and for help with anything related to your IT needs, Data Magic is your partner for comprehensive managed IT services. If there’s something you need — from IT advice to fully managed IT services — feel free to reach out below!

Categories
Blog

How to Password Protect a Word Document in 2021

Are you trying to figure out how to password protect a Word Document? No worries, we’ve got the solution in just a few simple steps.

When you password-protect your Word document, you will be encrypting it.  This requires anyone wanting to access the Word doc (including you) to de-encrypt it to access. That is where the password comes in.  Without the password, nobody will be able to open the document.

One word of warning (no pun intended), though, it’s up to you to remember the password you use to encrypt it. If you forget your password, you’re out of luck.  Microsoft does not provide a way to recover a lost password on a Word document.

How to Password Protect a Word Document on a PC

  1. Open: Open the document on your computer.
  2. File> Info: Select File in the upper left corner or and look for Info, which is usually the fourth item down under Home, New, and Open.
  3. Info > Protect Document: When you click Info, click on Protect Document.
  4. Encrypt with Password: For basic password protection, select Encrypt with Password from the pull-down menu.
  5. Enter your password. You can use anything you like, although it is case-sensitive.
  6. Verify your password a second time to make sure you didn’t make a mistake in typing it in and  then hit OK to finalize.
  7. When you save your document, it is password protected.

That’s how to protect a word document on a PC.  Next time you want to open the document, you will be prompted to enter the password before getting access.  If you share the document with someone else, they will need the password to open it.

You may have noticed other options under the Protect Document menu.  You can also choose to grant access in read-only mode, restrict editing or access, add a digital signature, or mark it as a final document from the same pull-down menu.

How to Password Protect a Word Document in Office 365

If you are using the online version of Word as part of the Office 365 suite, the process will look the same except you will be saving your document to the cloud rather than locally on your computer.

How to Password Protect a Word Document on a Mac

If you are using a Mac for Word documents, the process is nearly identical but things are in slightly different places.  Here are the steps for how to protect a Word document on a Mac.

  1. Open: Open the document on your computer.
  2. Review > Protect: Select Review from the top menu and then Protect.
  3. Protect > Protect Document: Click on Protect Document.
  4. Encrypt with Password: Select Encrypt with Password.
  5. Enter your password. You can use anything you like, although it is case-sensitive.
  6. Verify your password a second time to make sure you didn’t make a mistake in typing it in and  then hit OK to finalize.
  7. When you save your document, it is now password protected.

We hope that this information helps you to improve the privacy of any documents you have within Microsoft Word. Any lingering questions? Reach out below!

Categories
Blog

Simple speech to text with Microsoft Dictate in 2021

Have you ever wanted a quicker way to input information into your documents, emails, and presentations within Microsoft 365? Microsoft Dictate is an excellent speech to text solution that’s built into your favorite Microsoft apps. Here’s how to use it, plus a review of its functionality.

Finding Microsoft Dictate

If you’re using the latest version of Microsoft 365, Dictate is already present inside many of the most popular standalone apps, including Outlook, Word, and PowerPoint. To find it, simply open one of those programs and look for a dictate button in the home section of the menu. (It will probably look like a microphone with a record button.)

Using Microsoft Dictate for speech to text

To use Microsoft Dictate, click the button in the menu to get started. You’ll probably see a small popup with a microphone button. Click that, and you’ll hear a sound that indicates Microsoft is now listening to your speech.

Once you see the “Listening…” text, simply start speaking, and what you say will be transcribed into your program.

Microsoft Dictate is intelligent, analyzing what you say and correcting itself as it goes. You’ll sometimes see it replace a mistake after the fact with what you actually said.

Microsoft has been hard at work and developing speech recognition for Cortana and Microsoft Translator, and the company has even made recent acquisitions in this space. All the same computational power and machine learning powers this dictation function within Microsoft 365.

You can add basic punctuation as you talk by saying words like “period,” “comma,” or “open parentheses.” Or you can let Microsoft try to get it right by clicking on the settings on the Dictate widget and choosing “Auto punctuation.”

There are a variety of commands that Microsoft suggests to use to get the most out of the Dictate tool.

Use Cases for Dictate

Microsoft Dictate has several use cases. The most obvious one is as an assistive speech to text tool for anyone who’s not particularly comfortable typing. This could include people who haven’t formally learned to touch-type as well as those with physical limitations or even certain reading disorders like dyslexia.

Dictate can also be a boon to anyone with repetitive stress injury, where long periods of typing can exacerbate an injury. By composing the bulk of a newsletter or email by voice dictation, an employee can avoid 85 to 90% of the keyboard and mouse usage normally required to do so.

Limitations of Microsoft Dictate as a speech to text tool

As impressive as the tool is, there are some limitations in Microsoft Dictate. The tool is intelligent but not omniscient. In other words, it won’t get everything right.

We wrote this entire blog post using the tool, but we had to make several manual corrections after the fact. For example, back in that second paragraph: the software correctly capitalized PowerPoint but did not capitalize Outlook or Word (since those words could either be brand names or regular ol’ nouns).

You might find yourself stumbling when looking for less common punctuation or symbols as well. Often, it’s easier to just put those types of characters in manually.

And then there are the words that Microsoft can’t possibly know. There are plenty of obscure brand names and acronyms in the tech industry, and it can be tough to get these right in any dictation program, including Dictate.

That said, Microsoft’s offering is far better than some others, and you don’t even have to pay anything extra for functional speech to text software.

That’s it for this week’s tech tip, but stay tuned for more technology tips and tricks in the coming weeks!

Categories
Blog

How To Prevent Ransomware in 2021

The internet can be a wonderful place filled with entertainment and knowledge. Unfortunately, there are plenty of malicious sites and hackers out there that can cause havoc for you or your business. Ransomware has become an increasingly popular way to infect computer networks. In 2019 alone, new variants of ransomware cyber-attacks increased by 46%.

Ransomware is a computer virus that denies users access to their systems. You regain control of your computers by paying a ransom to the hackers. 

What can you do to keep your computer networks safe? In this article, we’ll cover how to prevent ransomware. 

What Is Ransomware?

To get more in-depth, ransomware is a malware program. It infects a system and encrypts the data on the network. While this can happen to your personal computer, it has been increasingly used against large companies and computer networks. The ransomware will request payment to decrypt the files. If not paid, the files are normally deleted.

How Ransomware Spreads and Works

Most malware, viruses, and ransomware spread through email spam or targeted attacks. Clicking on an unsuspecting link in an email or on a website installs the ransomware on your computer.

Once the exploit is installed, the program will search for valuable files and encrypt them. Many ransomware programs will attempt to spread to other computers and servers on your network. This can be devastating to large computer networks and could cripple a corporation or government network. 

The ransomware will then contact the user and request payment or the files will be deleted. A computer or network that is not backed up is risking losing all the encrypted data.

A Short History of Ransomware

Ransomware can be traced back to an attack in 1989 that targeted the health industry. Since then, the attacks have become more dangerous. Here is a list of some of the more famous ransomware attacks victims have suffered.

  • Locky spread in 2016 by using spam emails with infected attachments.
  • In 2017, WannaCry affected 230,000 computers and caused $4 billion in damages.
  • Shade/Troldesh was so effective many victims received discounts due to continual use.
  • Cryptolocker affected 500,000 computers in 2007.

Ransomware Attacks in 2021

Recent news has been filled with devastating ransomware attacks. 

The Colonial Pipeline hack had a significant impact on the infrastructure of The United States. Gas supplies were severely limited for months along the East Coast. This ransom of $4.4 million was paid in bitcoin to the hackers responsible. Luckily the US government has recovered $2.3 million of the ransom so far.

Brenntag had 150GB of data stolen by the same hacker group responsible for the Colonial Pipeline hack. The company paid $4.4 million to recover the stolen data.

The computer manufacturer Acer was hacked and had data ransomed for $50 million in May of 2021.

In January, Serco, a government outsourcer that manages COVD-19 testing was hacked. The ransomware held 1.5TB of data hostage.

Countless ransomware attacks happen every month. While it becomes easier and easier to program effective ransomware, there are steps you can take to avoid ransomware and protect against it. 

Should You Pay the Ransom?

In most cases, we advise against paying the ransom. Always be prepared with backups of all your data to avoid paying any ransom from an attack. Many business insurance policies can also help to cover cyberattacks and can help you manage costs. We also encourage notifying the FBI of any attempted cyberattack on your business. 

How to Avoid Ransomware

Avoiding ransomware is the best defense against these programs and viruses. Backing up your data is also essential. From personal external hard drives for your PC to backup data networks for your corporation, backing up your data can make you much safer. 

There are several steps you can take to be safe and secure no matter where you are accessing your computer or network. This is especially important for remote workers who may be accessing important data through different WiFi connections. 

  • Always use reputable antivirus software and use a firewall. 
  • Inbound emails should always be filtered and scanned for viruses.
  • Never provide personal information when answering unsolicited emails, calls, or text messages.
  • Always ensure your programs and operating systems are up-to-date and have the latest patches.
  • Use a virtual private network (VPN) when using public WiFi.
  • Never click on a link from unsolicited social media messages or accounts. 
  • Use a managed IT service that can provide ransomware protection.
  • Use two-factor authentication for your networks, devices, and computers.

While many of these prevention methods can be handled by individual employees, many require an expert IT team behind the scenes.

Get Additional Ransomware Protection From a Managed IT Service

Hiring a managed IT service can give your business the experience and knowledge to protect against ransomware attacks. Running any business today requires an IT department, but unfortunately, not every business is large enough to warrant a dedicated IT team.

A managed IT service lets you outsource your IT needs to a third-party provider. A talented managed IT team will help protect you from ransomware attacks. Whether you need data backups or a VPN setup, hiring a managed IT service such as Data Magic can make any sized business safer from ransomware attacks. 

  • Provide continuous backups for all data and files on your networks.
  • Upgrading and patching software and operating systems to reduce exploits.
  • Set up safe and secure laptops for remote work employees.
  • Establish VPN and Firewall systems to protect against hacks and malware.
  • Security key and password management services.
  • Installing malware scanners.
  • Cybersecurity education and lessons.

Help Prevent Ransomware

Ransomware is a serious problem that can have devastating effects on you or your business. This year, we saw hackers successfully take hostage of the US pipeline software – creating the colonial pipeline shutdown using a ransomware attack. Don’t let hackers destroy years of your personal or business data.

Even though there are more and more cyberattacks in 2021, there are many ways to prevent ransomware and protect your business. Follow best practices, backup your data, and find an expert IT team. that can help secure your computers and network. 

If you are having trouble running your IT department or don’t understand how to protect your networks, there is help. A managed IT service like Data Magic is an ideal solution for all sizes of companies and corporations. 

Categories
Blog Cyber Security Blog

5 Helpful Microsoft Teams Apps to use in 2021

You may already be using Microsoft Teams for collaboration via video, chat, collaborative Office documents, and so forth. But through Microsoft Teams apps, you can also integrate all sorts of other apps directly into the Teams app. Some of these are first-party Microsoft apps, while others are third-party apps, including major popular applications you may already be using.

Check out 5 apps that can be incredibly helpful when integrated with Microsoft Teams. We’ll explain what each does and how you could potentially improve your workflow by using these Microsoft Teams apps.

1. Polly

Polly is a simple yet powerful survey creation tool. Microsoft has its own MS Teams app called Forms, but the functionality there is hard to use well. Polly is simply a better solution for surveys of all sorts.

These can range from quick, ad-hoc small-group polls to company-wide surveys. Find out what your on-site team wants to grab for lunch or gather anonymous feedback about a major company initiative.

Best of all, because Polly integrates as a Microsoft Teams app, you can run your Polly polls from within Teams, gathering Team-specific data for any Team you administrate in the app.

2. Karma

Karma allows employees to nominate peers or even groups with positive feedback and is something you can use as a part of your employee performance tracking. Sharing accolades and commendations is more challenging when your team is partially or wholly virtual, but Karma helps bring greater authenticity to virtual recognition and awards.

3. Vacation Tracker

Vacation Tracker has been one of the best Microsoft Teams apps for our own internal team because it adds a much-needed function that’s missing from Outlook and Teams default calendars.

It can be a real challenge to track how many vacation days your employees have left, not to mention when they plan to use them. But if you end up with most or all key stakeholders out at the same time, you could be in operational trouble.

Vacation Tracker allows employees to send vacation requests directly to a team lead, who can see in the Teams app who else might be already out that day. The team lead can approve or deny the request right there in Vacation Tracker.

Vacation Tracker can also track sick time, PTO, and any other kind of benefit time/day that your company has.

For smaller businesses who may not have similar functionality built into their timekeeping or payroll systems, Vacation Tracker is one of the most convenient Microsoft Teams add-ons out there.

4. Trello

Trello is a well-known and widely used project management tool that can deliver plenty of functionality on its own. The company has also released a Microsoft Teams app so you can integrate your list-based project management directly into Teams.

Not using Trello? That’s not necessarily a problem. Many modern project management tools already integrate with Microsoft Teams (or will soon). Try searching the Microsoft Teams apps add-on list to see if there’s an MS Teams app from your preferred partner.

5. Health Hero

Wellness programs are gaining traction at many companies today. Health hero allows your employees to add fitness tracking data from their fitness wearables and track their progress toward their fitness goals. Employees can even engage with one another in employee-driven fitness competitions and the like.

Health Hero can be a great Microsoft Teams app for building camaraderie, not to mention increasing overall health within your team.

Bonus Pick: Employee Ideas

Employee Ideas is a first-party Microsoft Teams app that allows your team to generate ideas that can create value for your organization. Team members can vote on and discuss ideas (including photo and file attachments and custom notes), and you can view and manage idea campaigns.

Any lingering questions? Reach out below!

Categories
Blog Cyber Security Blog Uncategorized

Reliable Windows 10 Performance Tracking: Keep Track of your Computer’s Performance

You don’t have to be a power user to check your computer’s performance in Windows 10. Microsoft has provided some straightforward tools that can give you insights into how your computer is doing as well as the likely source of any slowdowns you’re noticing. They also have numerous tips to improve your Windows 10 performance if it is lacking.

If you’ve been a Windows user for long, you probably know about Task Manager, which can be a useful tool to analyze which programs are using what resources. However, in recent iterations, Microsoft has made Task Manager less useful for actually understanding where your resources are going. You probably still use it for killing unresponsive apps, but that might be it.

Xbox Game Bar Gives Excellent Windows 10 Performance Metrics

If you’re looking for how to check computer performance Windows 10 gives you some new tools to do so. In this short explainer, we’re covering Xbox Game Bar’s computer performance widget. This tool was created for gamers and streamers to give them an easy way to capture gaming footage, but its business applications are impressive as well.

In another recent post, we covered how to create simple screen recordings using Xbox Game Bar, so be sure to check out that post if you haven’t yet. Today, we’re focusing exclusively on the Performance tab.

How to Launch Xbox Game Bar

There are two ways to launch Xbox Game Bar. You can search for it in the task bar (“game bar” will work), or you can use a keyboard shortcut: Windows Key + G. Either method will bring up an overlay on your screen.

You can ignore the capture, audio and Xbox Social widgets for now: All you need currently is the Performance widget.

Understanding the Performance Widget

The Performance widget shows you exactly how your computer is diverting energy and shows where performance may be lagging or falling behind. You’ll see metrics for your computer’s CPU, GPU, RAM and FPS.

FPS is frames per second, which probably doesn’t matter to you if you’re only doing basic business tasks. But the other three categories matter a great deal in terms of Windows 10 performance.

Windows 10 Performance: CPU

The CPU, or central processing unit, is both the heart and brains of your computer. It’s the primary chipset that does all the basic computations necessary to run applications. The faster and more powerful your CPU, the more you can do and the faster you can do it.

If you’re seeing a very high percentage under CPU Performance, that means your CPU is nearing its maximum processing capacity. Closing apps that you aren’t using can cut down on background CPU usage.

Also, sometimes an app will malfunction in a way that takes up an inordinate amount of CPU performance. You may need to kill and restart an app in that situation.

If you’re running the bare minimum of applications to do your work and are still maxing out your CPU performance, then you likely need to upgrade your computer.

Windows 10 Performance: GPU

The CPU handles all the basic computing tasks, but there’s one important exception: graphics-intensive tasks. Your computer has a GPU, or graphics processing unit, that’s custom-designed to handle graphics processes. Some computers have a dedicated GPU, while others use a (cheaper and less powerful) integrated GPU.

If you’re running graphics-intensive software, expect GPU performance to run high. Again, if you’re unable to complete necessary tasks well and you see your GPU performance pushed to the max, you may need an upgrade.

Windows 10 Performance: RAM

RAM, or random access memory, is like your computer’s short-term memory. Everything that your PC needs to access regularly and quickly will get loaded into RAM rather than read off your hard drive.

Modern applications and operating systems can be quite RAM-intensive, but when your computer runs low on available RAM, performance takes a serious hit.

If you’re short on available RAM, kill or restart any applications that are using a large portion. Google Chrome is a great browser, but it eats RAM like candy — especially if it’s been running for a while. Simply restarting the browser can cut down its RAM usage significantly.

With all three, restarting your computer can give you a fresh start. After a restart, open only needed applications and then run the Performance widget. This will give you a sort of baseline of how heavily taxed your computer’s resources are under normal operating conditions.

Got Questions? Data Magic Can Help!

Data Magic has been helping businesses like yours increase productivity and performance through better managed IT services and solutions. Can we help you do the same? Reach out below!

Categories
Blog Cyber Security Blog

How to screen record Windows 10 Content

Have you ever encountered a situation where you needed to create impressive screen recordings? Perhaps you’re looking for a way to create video tutorials for business training. Maybe you just want a better way to record Zoom meetings or other videoconference events, or are simply wondering how to screen record Windows 10 content as efficiently as possible.

In the past, you’d have to invest in complicated software to do this well — not to mention, learn how to use the software. But Microsoft has actually provided a powerful and simple way to do this built right into Windows 10.

The steps to begin simple screen recording on Windows 10 are pretty straightforward. Here’s how to screen record Windows 10 content:

  1. Open the Xbox Game Bar application.
  2. Use the Capture widget to start a screen recording
  3. Click the Record button again to stop and save the recording

Let’s look at each of these steps in greater detail.

1. How to Screen Record Windows 10 Content: Open the Game Bar

To get started with simple screen recording in Windows 10, you’ll need to launch the Game Bar. This is an Xbox-branded suite of tools designed primarily with gamers in mind, but it provides plenty of productivity for business users as well.

To launch Game Bar, simply click in the search area of the task bar (next to the main button to open the Start menu) and type in “game bar.” The top result should be Xbox Game Bar, which is what you need to open.

There’s also a handy keyboard shortcut to launch Xbox Game Bar. Hold down the Windows key and press G to quickly launch Xbox Game Bar.

This application is designed to run over the top of whatever else you’re doing (usually, gaming). The app should run well and consume only minimal system resources no matter what’s going on in the background.

2. Use the Capture Widget to Get Started

Once you’ve launched Xbox Game Bar, you should see several widgets overlaying your screen. In the top left is the Capture widget. Simply click the Record button to begin a screen recording session. You’ll see other controls here, too, like a microphone/mute toggle and a webcam toggle.

Lower down, you’ll see an Audio widget, which you can use to manage volume levels if you have multiple audio components to your presentation. On the right side of the screen you’ll see performance info and Xbox social content, neither of which you’ll likely need to worry about.

Your screen recording begins as soon as you click the button, so make sure your desktop is displaying what you want and that you’re ready to begin before you click that button. Understanding how to screen record Windows 10 content is easier than ever with the efficiency of the capture widget.

3. Click the Record Button Again to Stop and Save

When you’ve finished your screen recording, simply click the Record button on the Capture widget a second time to stop the recording. Your video will automatically save, located under “show all captures.” From there, you can upload your screen capture or begin editing it in your favorite video editing application.

Whether you’re looking to create dynamic training videos or simply need a quick and easy way to record videoconference calls, the Xbox Game Bar is a powerful Windows 10 app that’s easy to learn and simple to use. We hope this blog has helped you to understand how to screen record Windows 10 content.

Make sure to follow Data Magic for more valuable tech tips like this one. And if we can assist your business with business IT support, don’t hesitate to reach out below!

Categories
Blog Cyber Security Blog

How to Set Up Dual Monitors on Your Computer

It doesn’t matter how many productivity apps, keyboard shortcuts or life hacks you throw at your work. Without enough screen space, your productivity is always going to be hampered. Adding a second monitor to your workspace is a simple, affordable change that can transform your workflow and productivity. Here’s what you need to know.

Advantages of Using a Dual Monitor Setup

There are numerous advantages to using a dual-monitor setup. With more screen real estate, you can increase productivity. When you can see more (and switch between windows less), you can move more quickly through your tasks.

You can also use two (or even three or four) applications simultaneously, no switching required. In Windows, you can quickly drag a window to the side of the screen to automatically enter split-screen view. With two monitors, you can do this twice, for four apps at once — each completely visible.

Best of all, setting up two monitors isn’t complicated and doesn’t require a ton of IT knowledge. Here’s how to setup dual monitors on Windows 10.

How to Set Up Dual Monitors on Your Computer

If you already have your two monitors on hand, all that’s left is to set them up. Here are the four steps you’ll need to follow.

Step 1: Determine Your Computer’s Display Connection Types

This step is the most technical-sounding, but it’s not as hard as it might sound. There are several types of video connections on the market today, so the first step is determining what kinds of display connection ports your computer has.

The most common types are these:

  • HDMI
  • DisplayPort
  • VGA (older, but still in wide use)
  • DVI (older, and diminishing in use)

Your PC should have labels (or at least icons) on its display connection ports, which should help you determine what you’re working with.

The easiest way to connect two monitors is to make sure that both monitors can match with at least one video output port on your PC. For example, if your computer has only a DisplayPort and a VGA connection, you’ll have the simplest time if you buy two monitors that have both of those connection types.

What if you’ve already bought your monitors and they don’t match the connection types on your computer? Good news: you can buy adapters that will convert just about any display connection to nearly any other. Simply search for “HDMI to VGA” or whatever configuration you’d need.

Pro tip: to function properly, the adapter should sit between the cable and the PC — not the other way around.

Step 2: Plug in Power and Video Cables

Once you’ve determined that your PC and monitors can connect (or have acquired the necessary adapters), it’s time to plug everything in. Plug in the monitors’ power cables and power on the monitors. You should see some light near the power button (typically), plus the display itself should begin emitting light (and usually displaying some sort of “no input detected” message).

Once you’re sure the monitors are on, connect the video cables to the monitors and then to your computer.

You should see something computer-related on both monitors. If so, on to step 3. If you don’t, skip to step 4.

Step 3: Configure Your Displays

The first time you plug in a second display, there’s no telling which way your PC will decide to orient it. Sometimes you’ll see a mirror image on both screens, even though what you really want to know is how to extend screen on Windows. Sometimes the second display will default to a bad resolution, where everything is way too big or way too small.

Right-click on the desktop and pick “Display settings.” Here you can configure a number of settings, including resolution, turning off screen mirroring, and arranging the displays.

Step 4: Troubleshoot as Necessary

Sometimes nothing will display on the new monitor. Usually, this is because the monitor isn’t displaying the correct input. If this happens, use the button controls on the monitor itself to manually select the right input type.

Sometimes the monitors will seem backward or uneven when you try to move the mouse from one to the other. If so, open up “Display settings.” Click “Identify” to show which display is which, and then click and drag the on-screen rectangles to position them to match real life.

Once you can see appropriately-sized content on both screens and the mouse moves evenly between the two, you know you’ve set up your dual monitors correctly.

Have any questions about setting up dual monitors at your business? Reach out below!

Skip to content